
Before you start #
You need:
- Zoho CRM administrator access, on an edition that supports Marketplace extensions.
- A Meta Business portfolio (business.facebook.com) where you are an admin. Business verification is recommended and is required for higher messaging limits.
- A phone number for WhatsApp. It can be a new number, or the number you already use in the WhatsApp Business app (Coexistence keeps the app working alongside the API).
- A payment method in WhatsApp Manager, for business-initiated (template) conversations, which Meta bills directly.
- Phone numbers on Leads and Contacts in international format, for example
+14155550123.
Setup takes about 20 minutes. The order is: install → connect CRM → get your Meta IDs and token → add the number → connect the webhook → import templates.
1. Install the extension #
- Open WhatsApp Messenger for Zoho CRM on the Zoho Marketplace and click Install.
- Choose which profiles get access (you can install for admins only first and add others later), accept the permissions and finish.
- The extension adds modules for messages, conversations, sender numbers and templates; a Chat related list on Leads, Contacts, Accounts and Deals; the Comm Hub Inbox tab; a Mass Send button; and a workflow action.
2. Open the extension's Settings #
Setup → Marketplace → All → Installed → Settings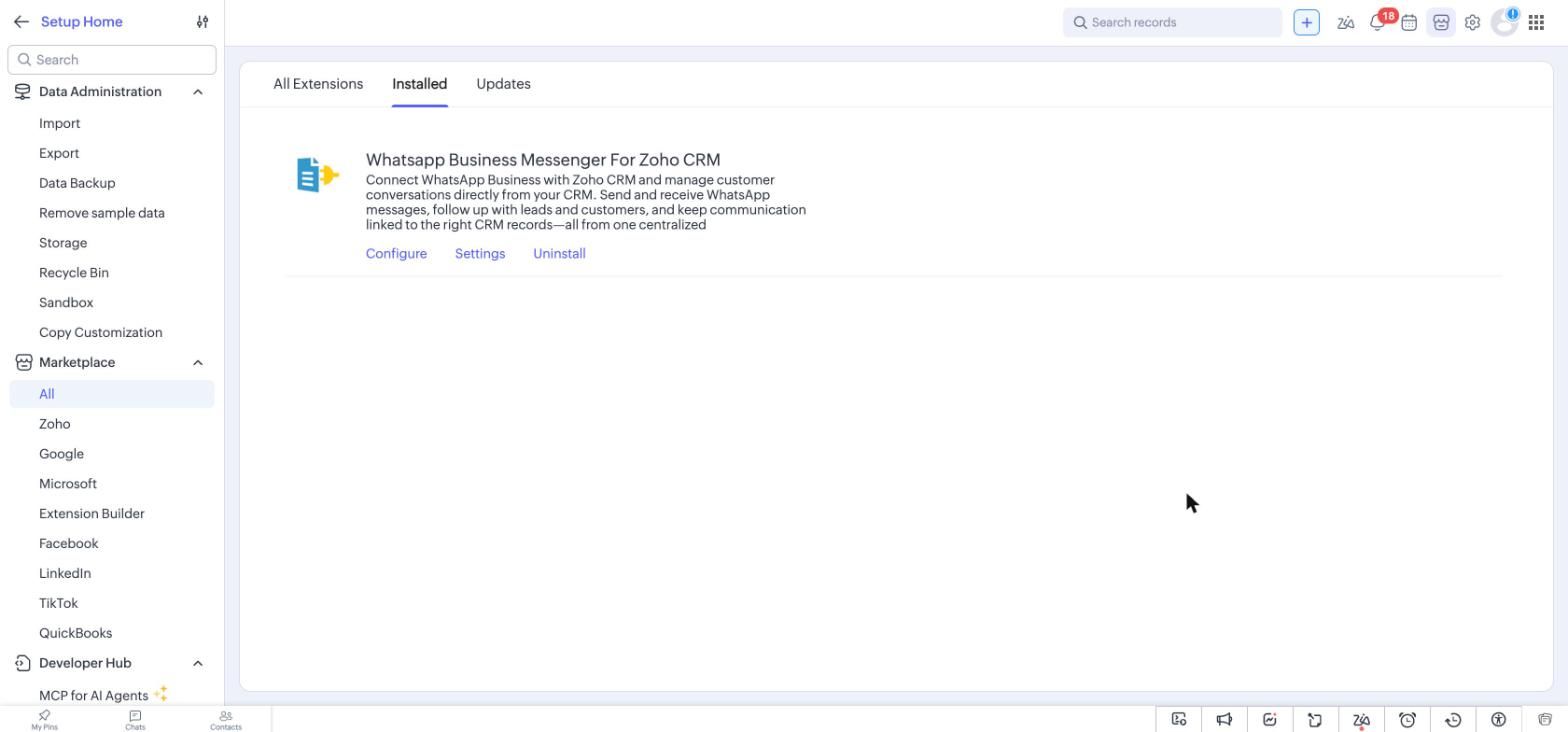
3. Connect Zoho CRM and global settings #
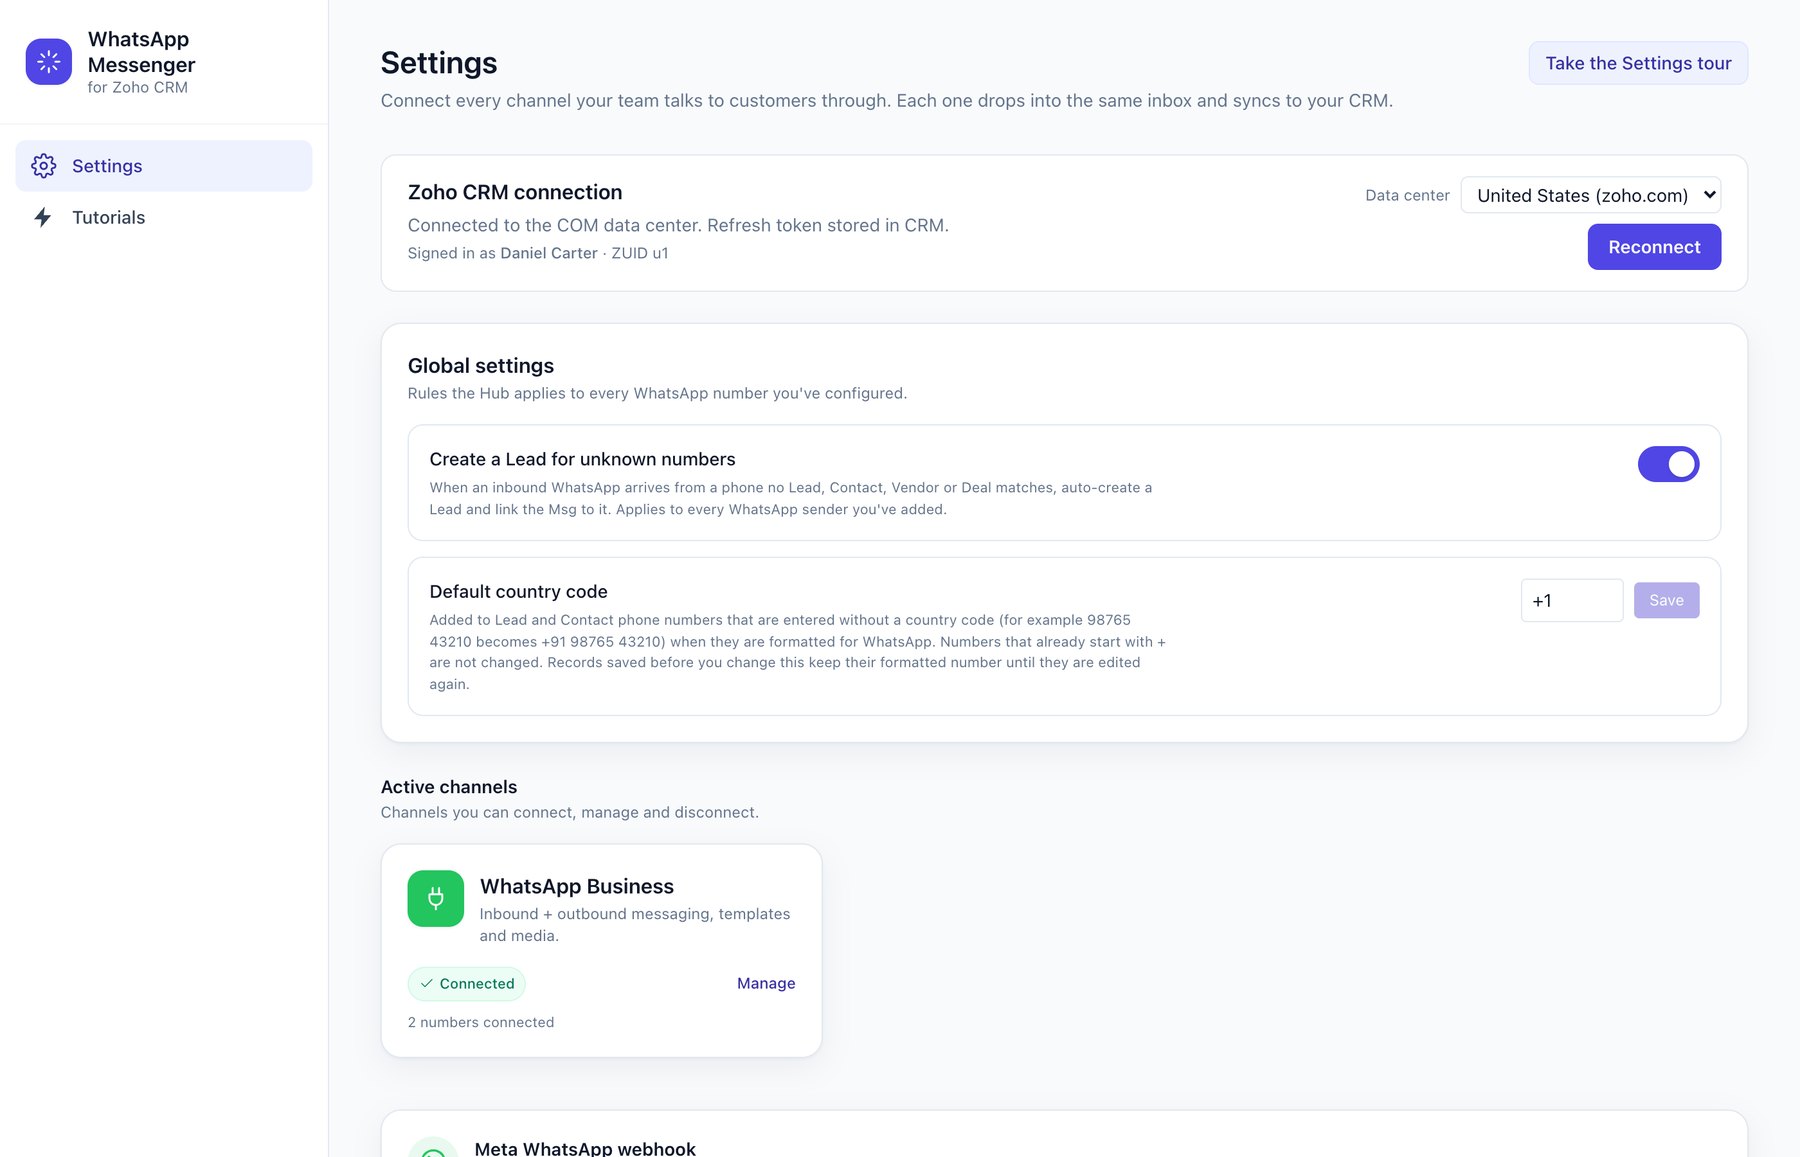
- In the first card, click Connect with Zoho CRM and approve the popup. The card then shows your data center and who connected it.
- Under Global settings, choose whether to create a Lead for unknown numbers. When on, a message from a number that is not in CRM creates a Lead and is linked to it.
4. Set up WhatsApp in Meta #
You collect four values from Meta: the Phone number ID, the WhatsApp Business Account (WABA) ID, the Meta App ID and a permanent access token. You also paste two values from the extension into Meta for the webhook (step 6).
4.1 Create a Meta app with WhatsApp #
- Go to developers.facebook.com → My Apps → Create app.
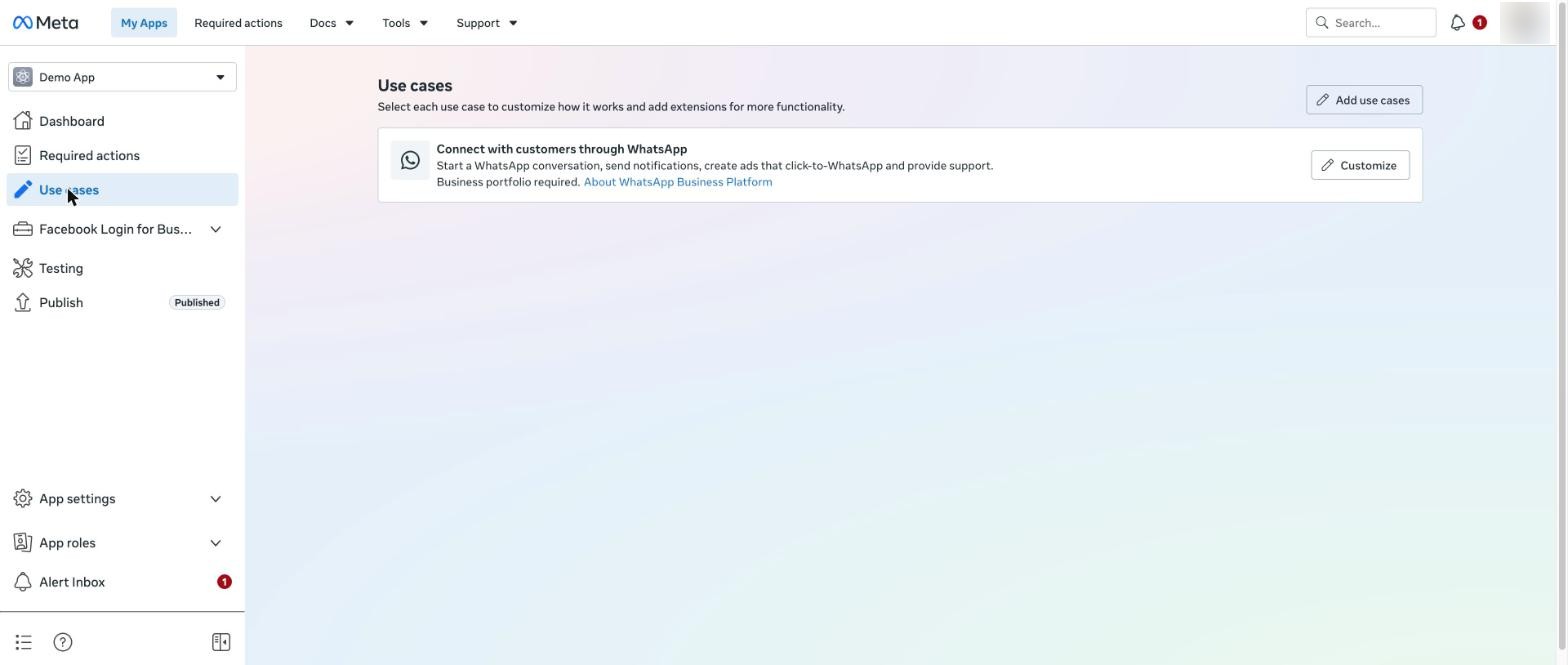
- Choose the use case Connect with customers through WhatsApp (app type Business) and link it to your Business portfolio.
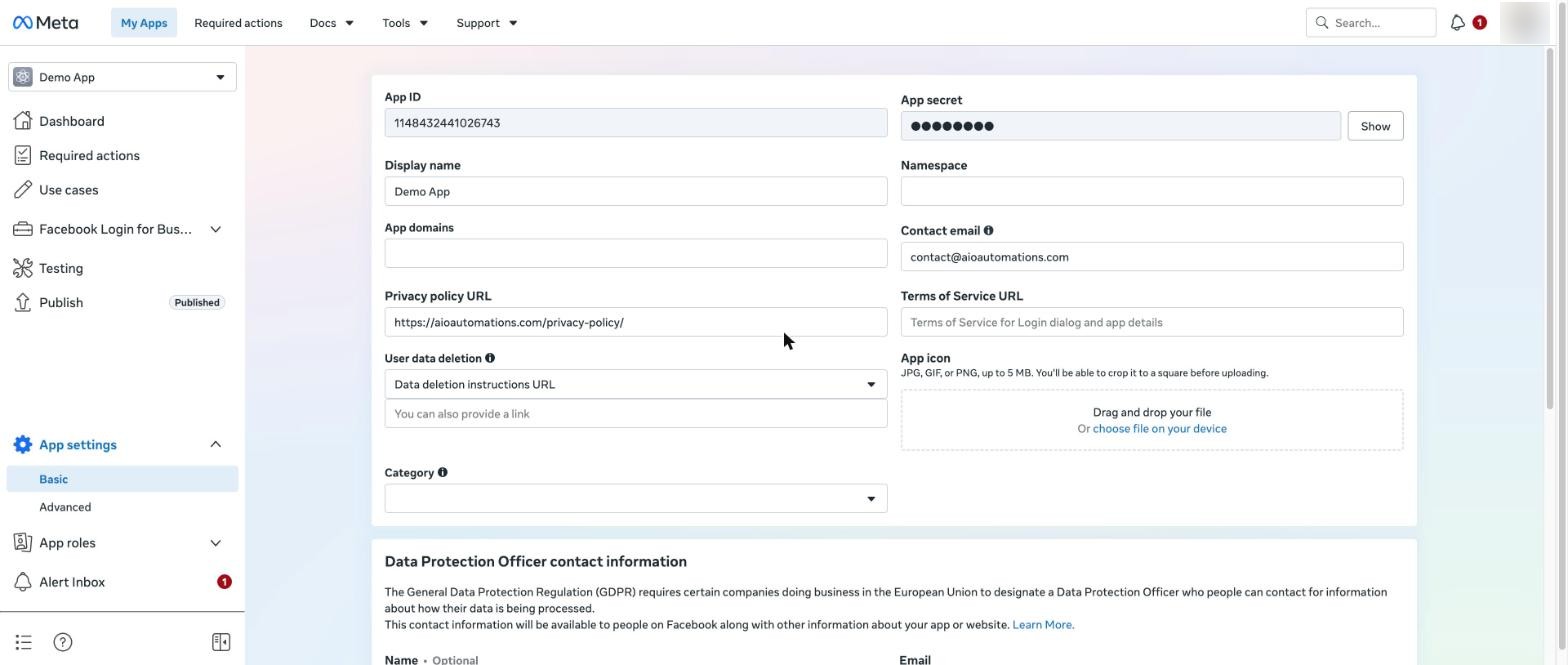
- Open App settings → Basic and note the App ID. The extension uses it to upload template header images.
4.2 Add your phone number #
- In the app dashboard, open WhatsApp → API Setup (or WhatsApp Manager → Phone numbers) and click Add phone number.
- Enter the business display name and the number, and verify it with the SMS or voice code. To keep using the WhatsApp Business app on the same number, choose the option to connect an existing WhatsApp Business app number and scan the QR code shown in the app.
- On API Setup, copy the Phone number ID and the WhatsApp Business Account ID. (Do not use the temporary token shown on that page; it expires in 24 hours.)
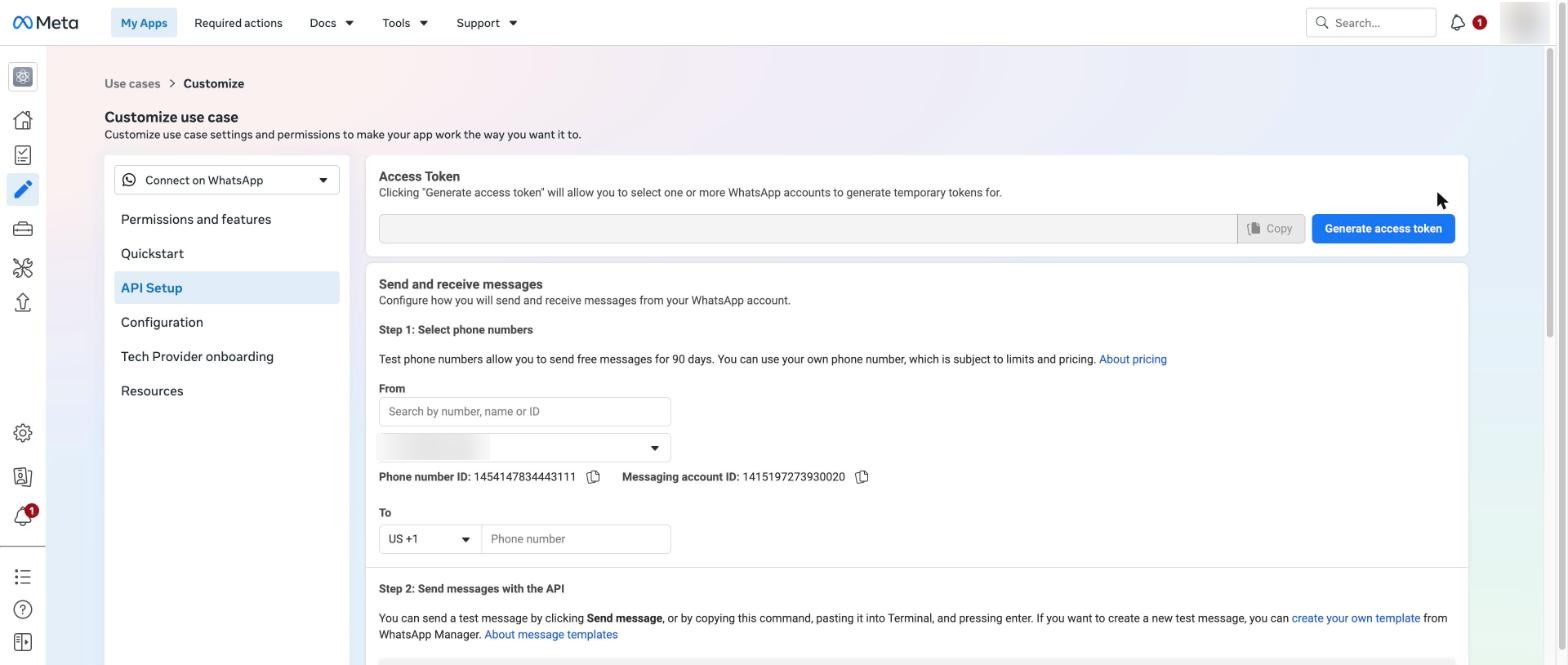
Tip: the Phone number ID is a long number, not the phone number itself. Both IDs are also shown in WhatsApp Manager → Phone numbers → the number's settings.
4.3 Create a permanent access token #
- Go to business.facebook.com → Settings → Users → System users and click Add. Give it a name (for example
zoho-crm-whatsapp) and the Admin role. - Click Assign assets: give the system user full control of your app and of your WhatsApp account.
- Click Generate token, select your app, set expiry to Never, and tick these permissions:
whatsapp_business_messaging,whatsapp_business_managementandbusiness_management. - Copy the token (it starts with
EAA). Meta shows it once. You paste it into the extension in the next step.
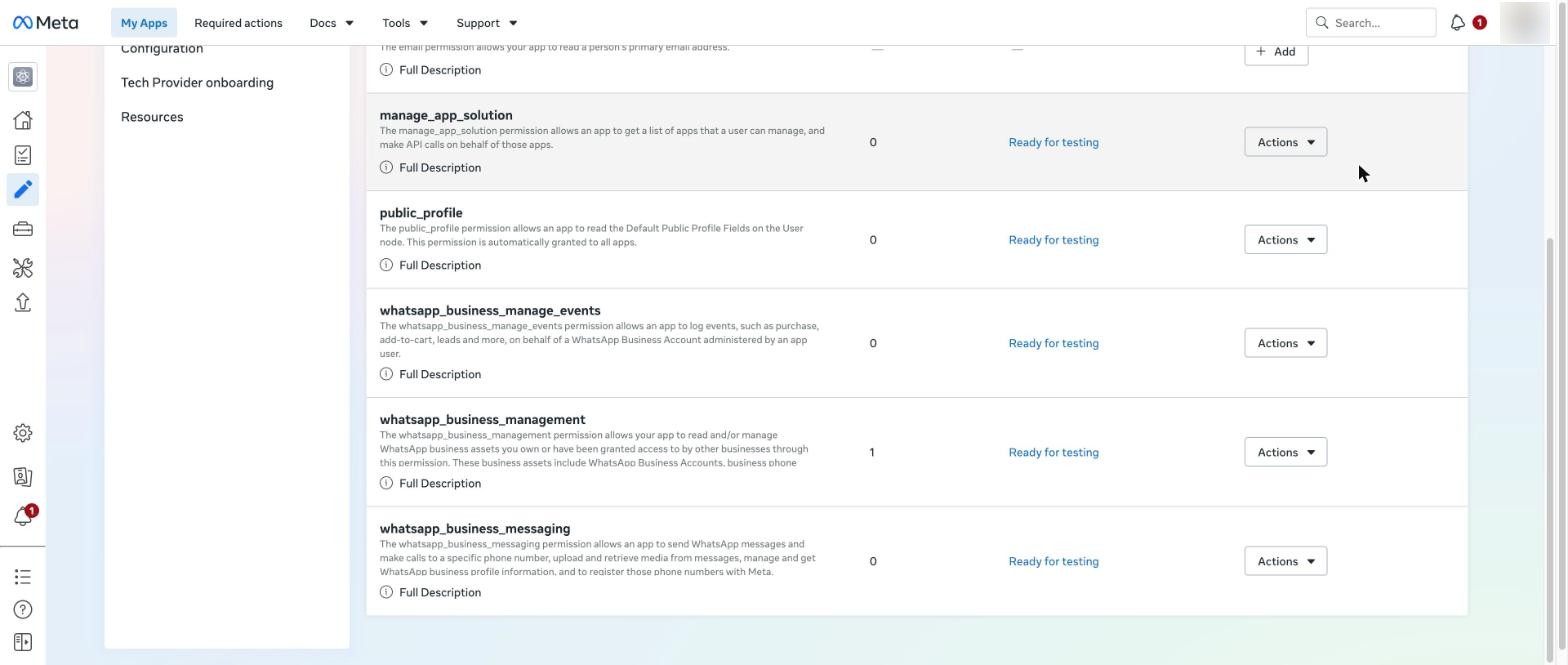
whatsapp_business_management and whatsapp_business_messaging.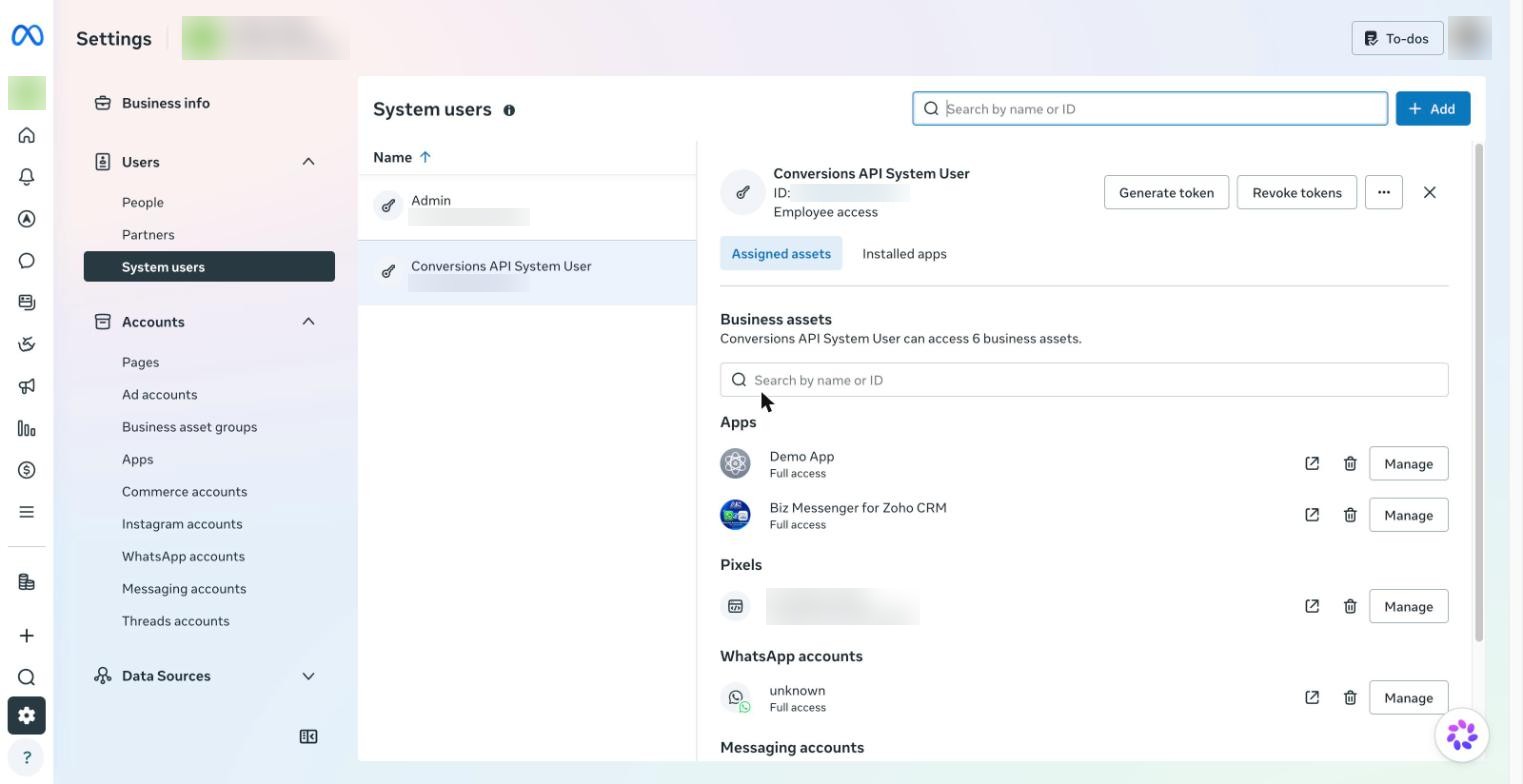
Keep the token secret. Do not send it by email or chat. If it leaks, revoke it in System users and generate a new one, then edit the number in the extension and paste the new token.
4.4 Add a payment method #
In WhatsApp Manager → Overview → Add payment method, add a card. Without it, Meta blocks template messages to customers who have not messaged you first.
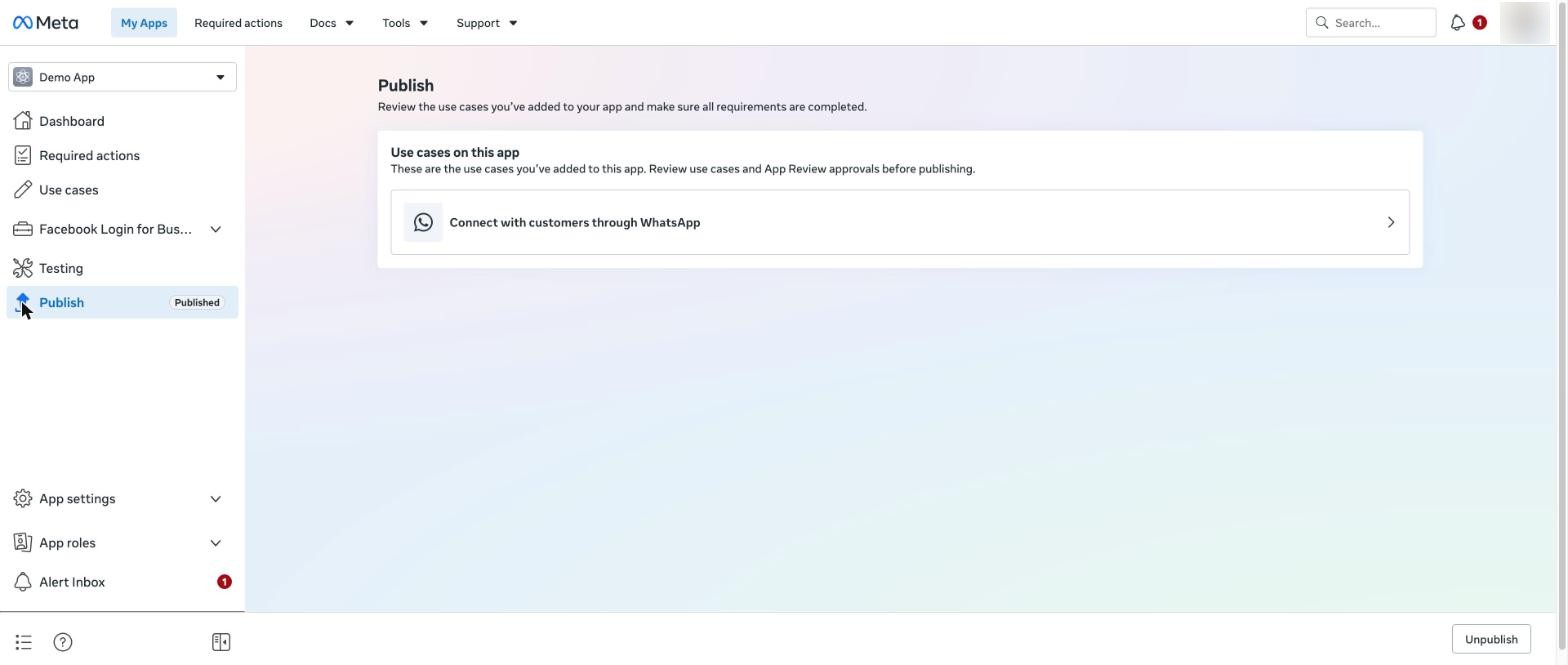
4.5 Publish the app #
Open Publish in the app dashboard and publish it. While an app is in Development mode, Meta does not send real customer messages to its webhook. The sidebar shows Published when it is live.
5. Add the number in the extension #
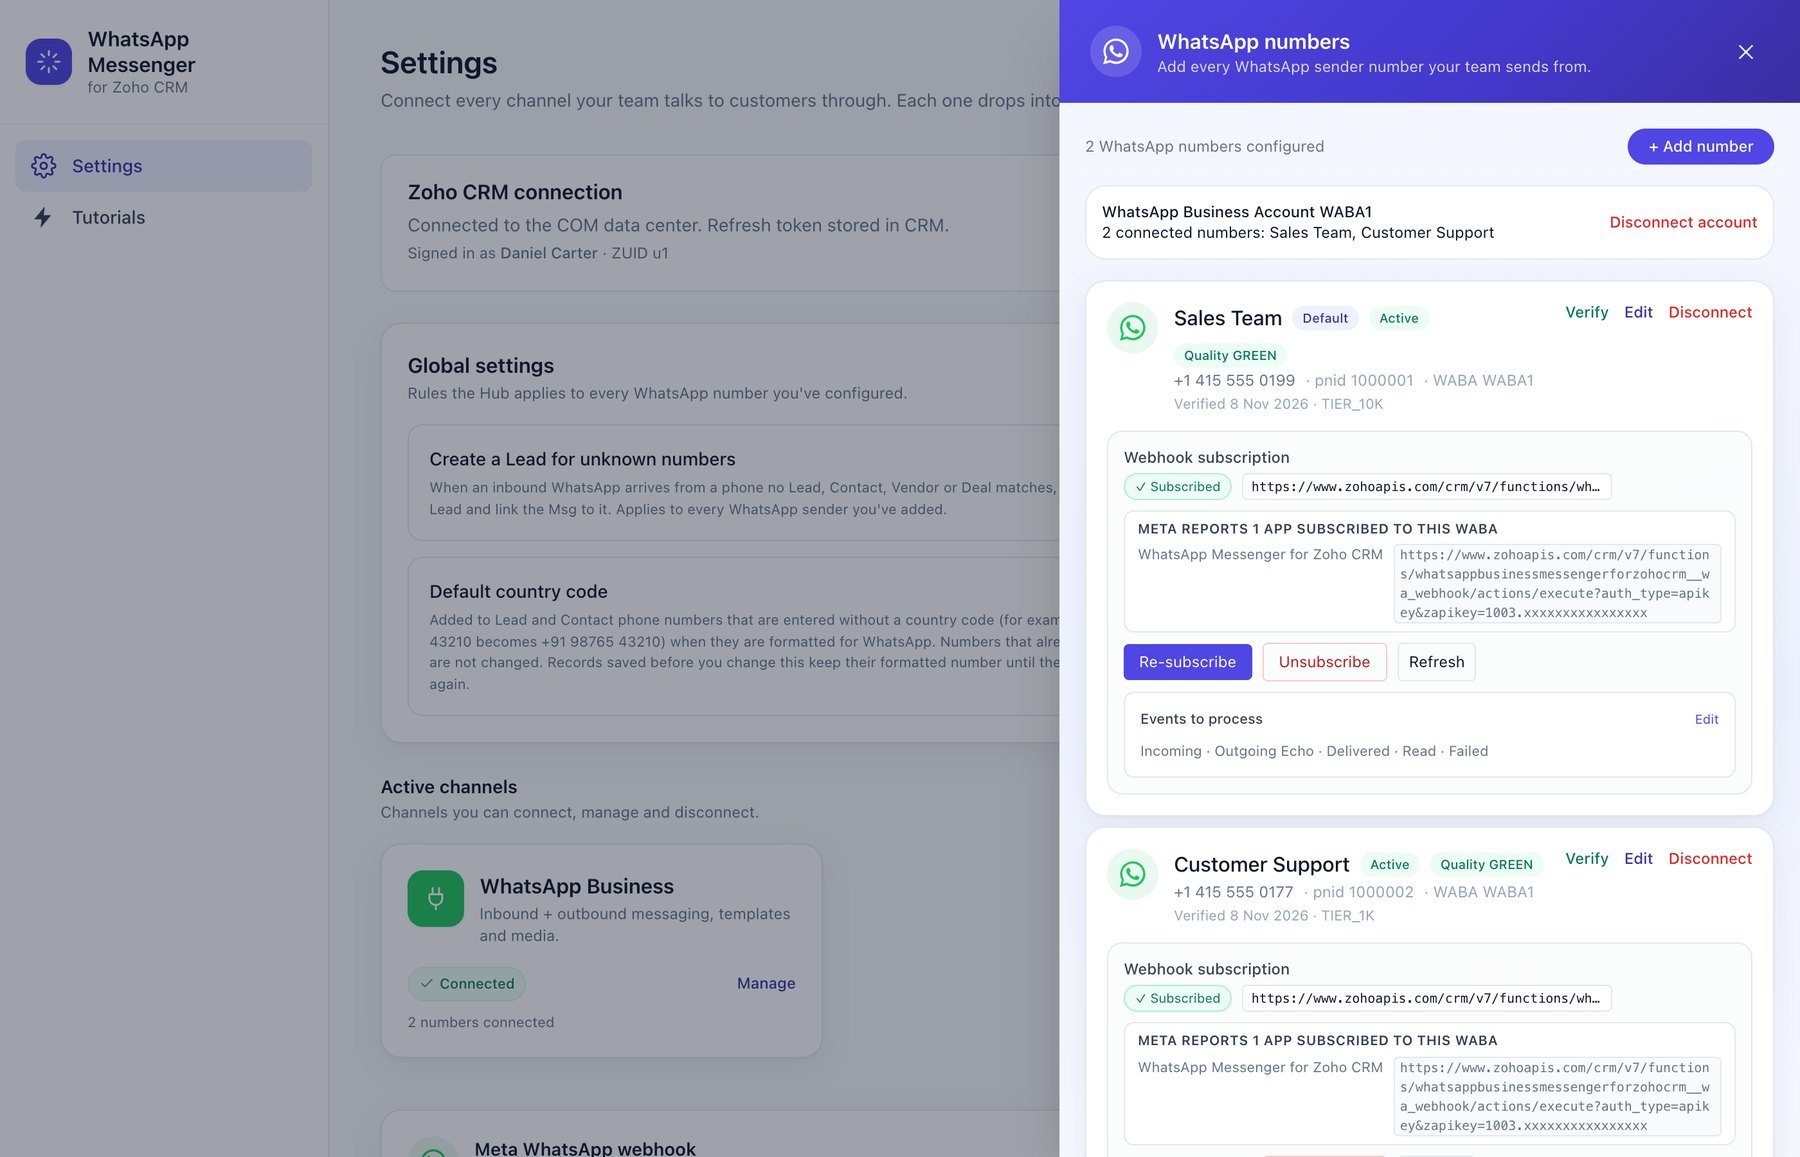
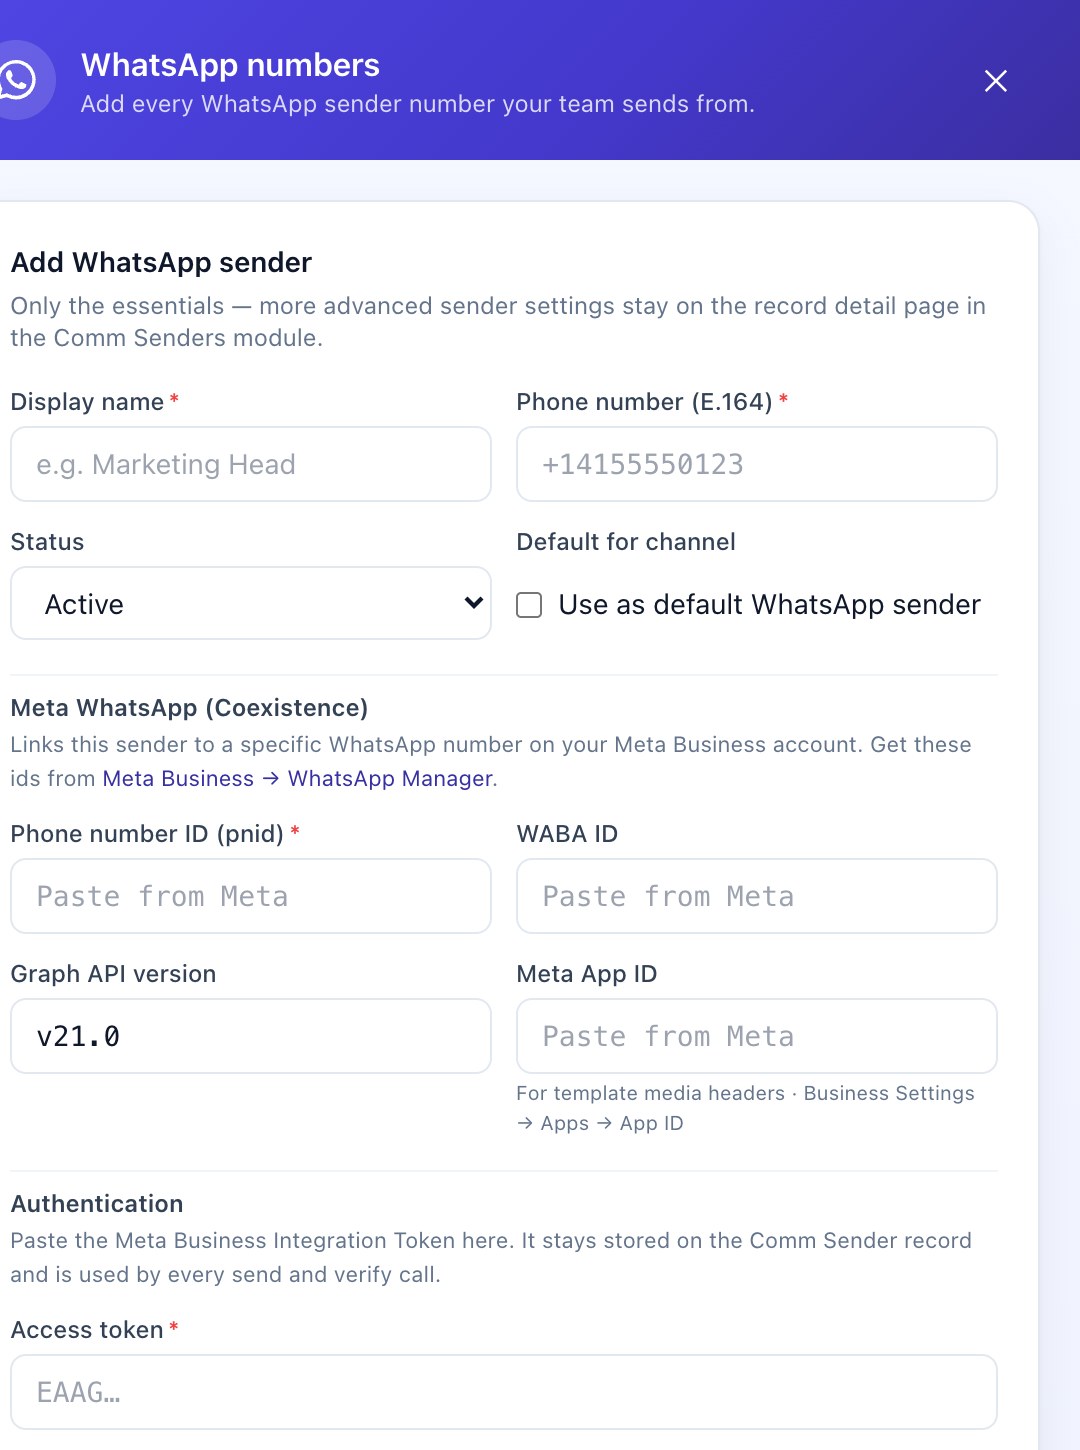
Settings → Active channels → WhatsApp Business → Manage → + Add number- Basics: a display name your team will recognise (for example Sales Team), the phone number in international format, status Active. Tick Use as default WhatsApp sender for your main number.
- Meta WhatsApp IDs: paste the Phone number ID and WABA ID. Leave Graph API version at the default unless support asks you to change it. Paste the Meta App ID.
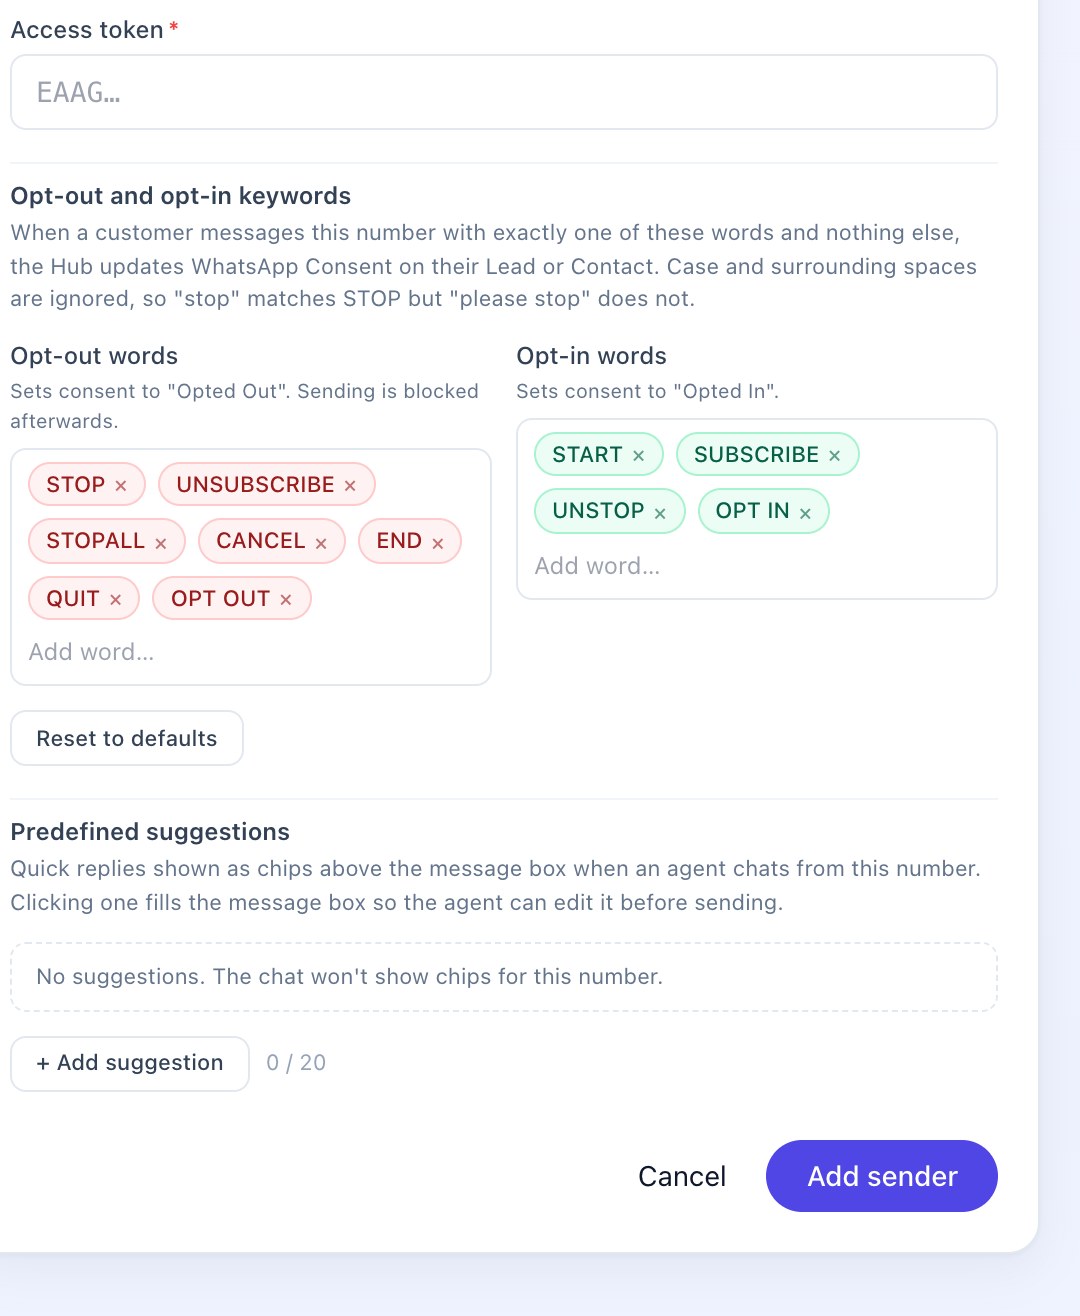
- Authentication: paste the access token. When you edit the number later, leave this empty to keep the current token.
- Opt-out and opt-in keywords: defaults include STOP, UNSUBSCRIBE and START. A customer's message must match a word exactly.
- Quick-reply suggestions: up to 20 saved replies for agents.
- Click Add sender, then Verify on the number's card. Verify reads the number's details, quality rating and messaging limit from Meta.
6. Connect the webhook #
The webhook is how replies and delivery ticks reach CRM. It has two halves.
6.1 In Meta #
- In the extension Settings, find the Meta WhatsApp webhook card and copy the Callback URL and the Verify Token.
- In developers.facebook.com → your app → WhatsApp → Configuration → Webhook, click Edit, paste both values and click Verify and save. The Verify Token must match exactly.
- Under Webhook fields, click Manage and subscribe to
messages.
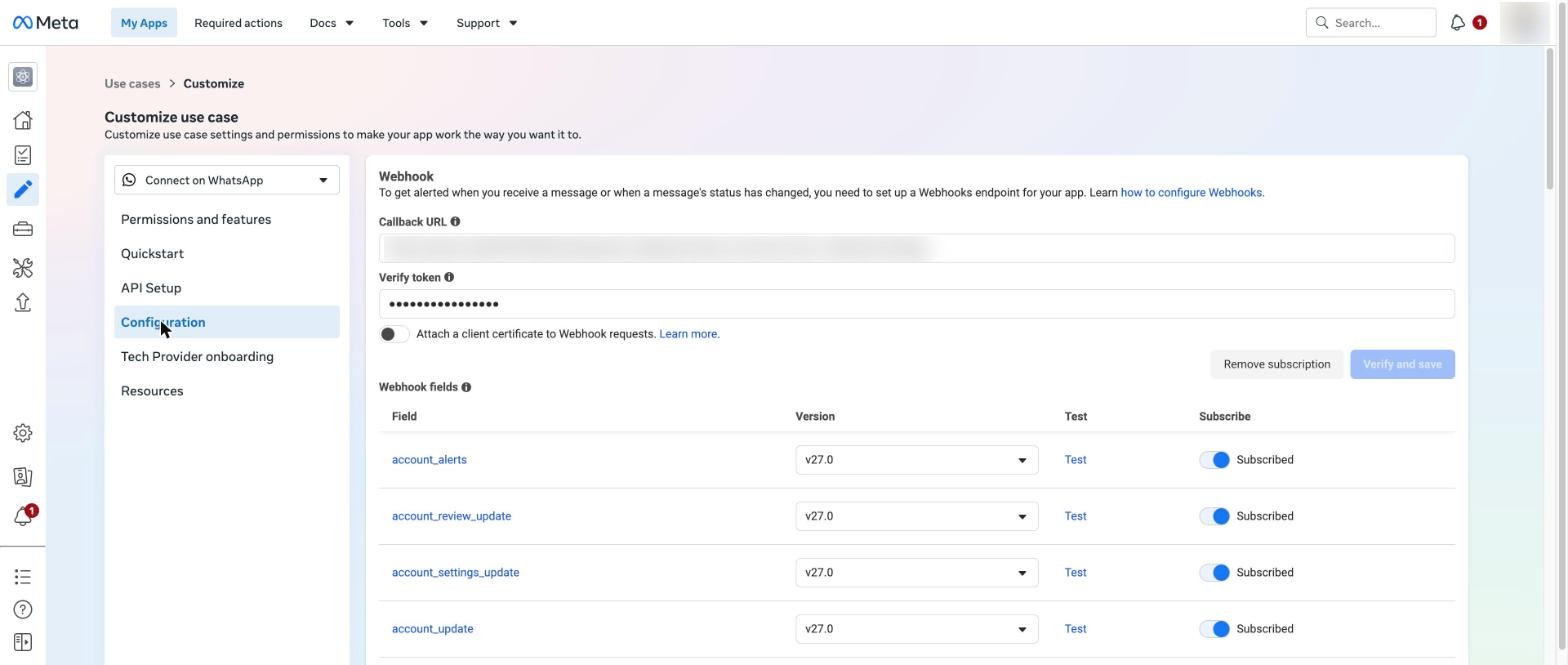
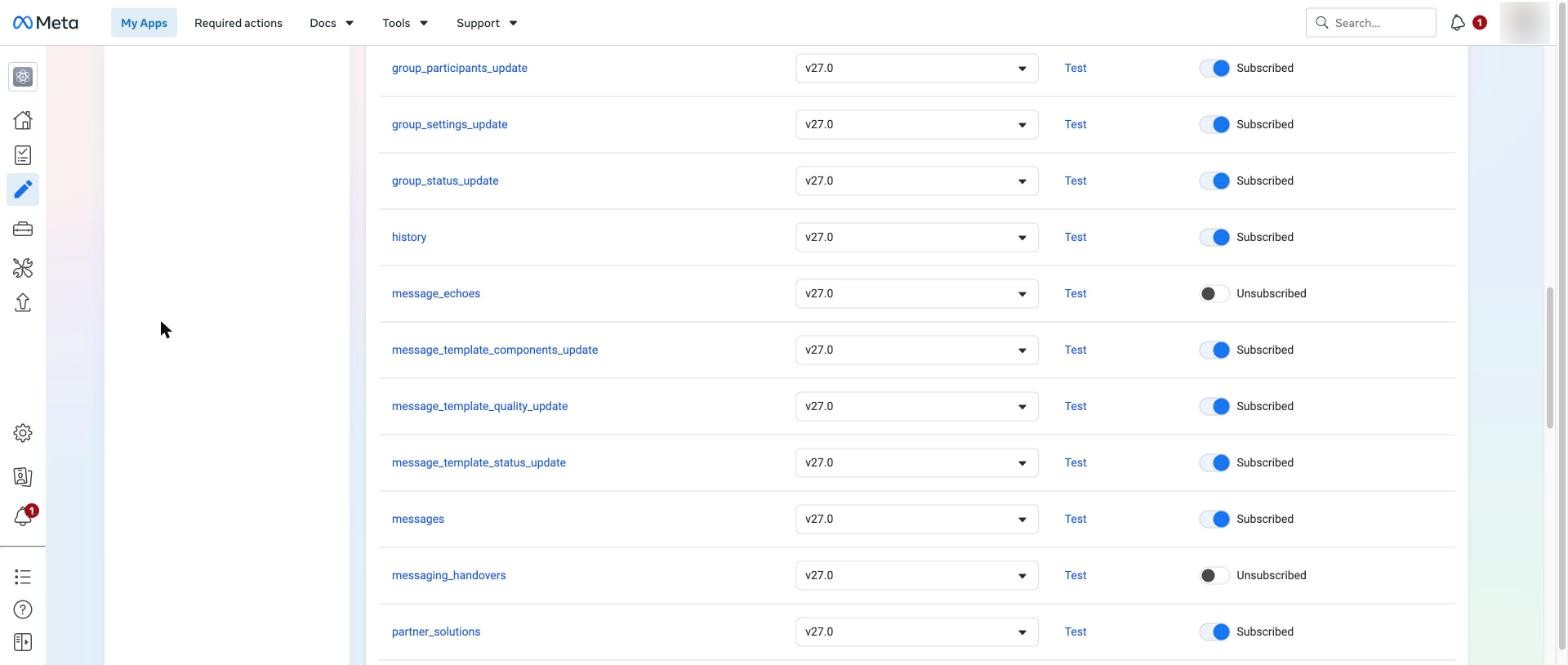
messages must show Subscribed.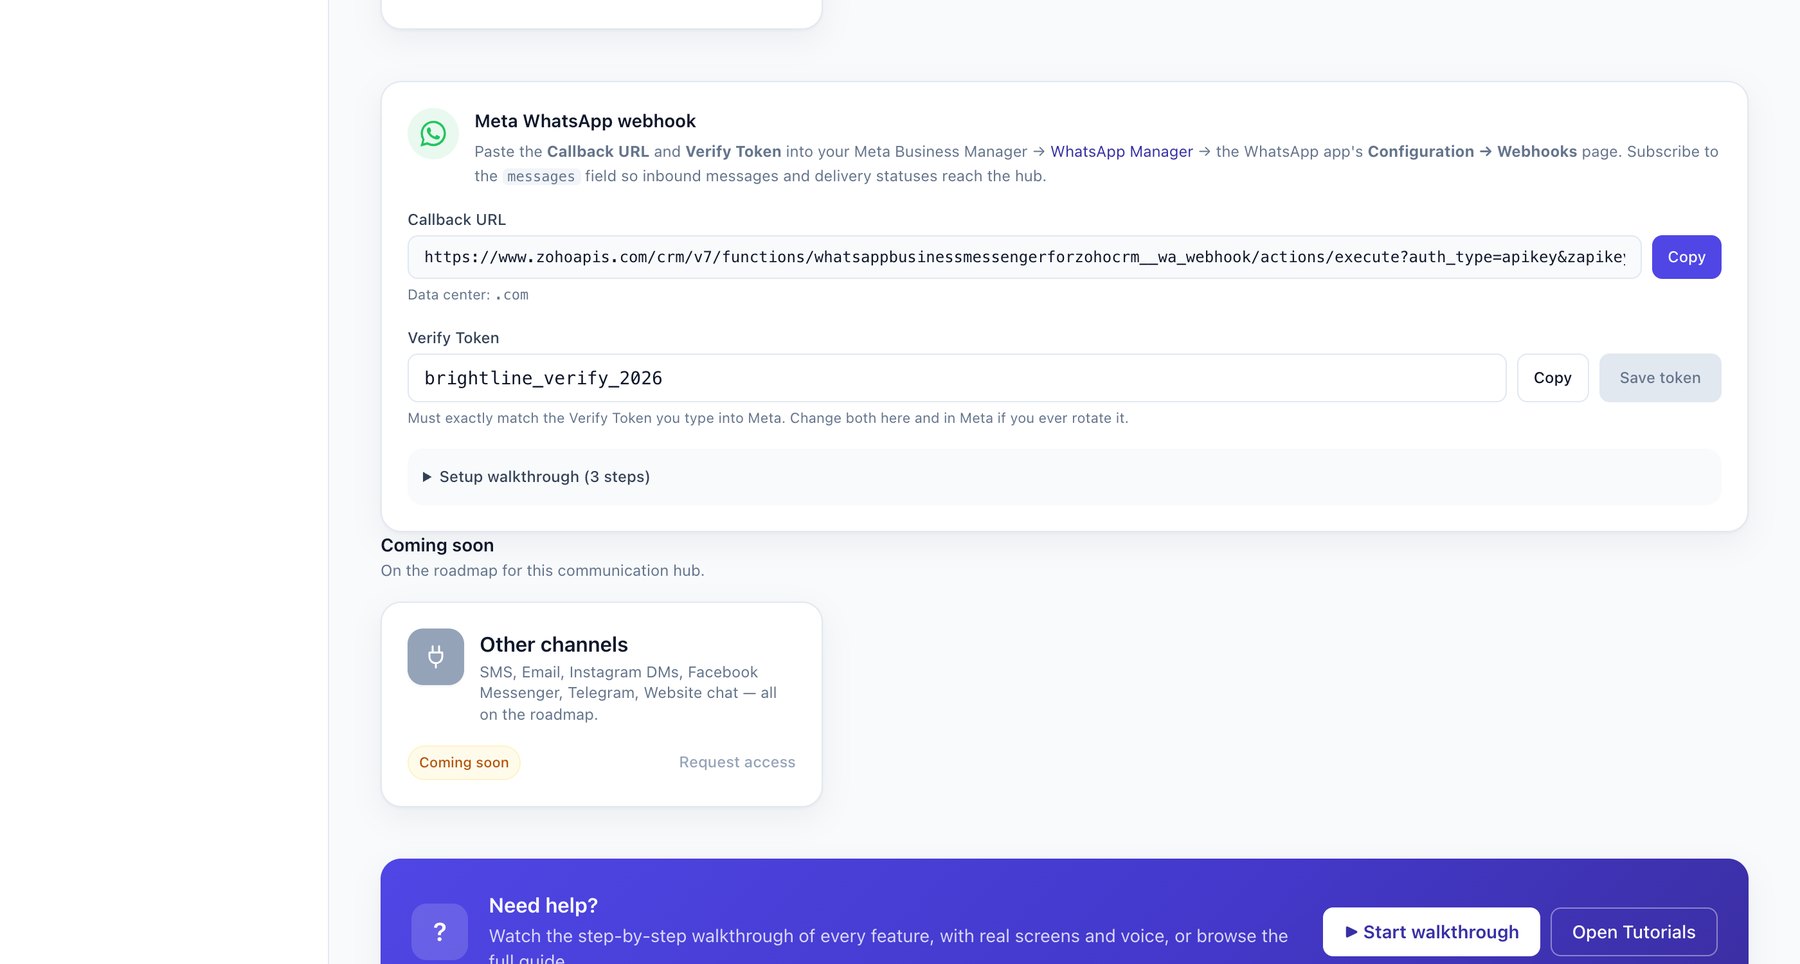
6.2 In the extension #
- Open Manage, and on each number's card click Subscribe to webhook. The card should show ✓ Subscribed.
- Under Events to process, keep Incoming, Outgoing Echo, Delivered, Read and Failed on unless you have a reason to turn one off.
- Test: send a WhatsApp message to your business number from a phone in CRM. It should appear in the Comm Hub Inbox within a few seconds.
7. Templates #
Import existing templates #
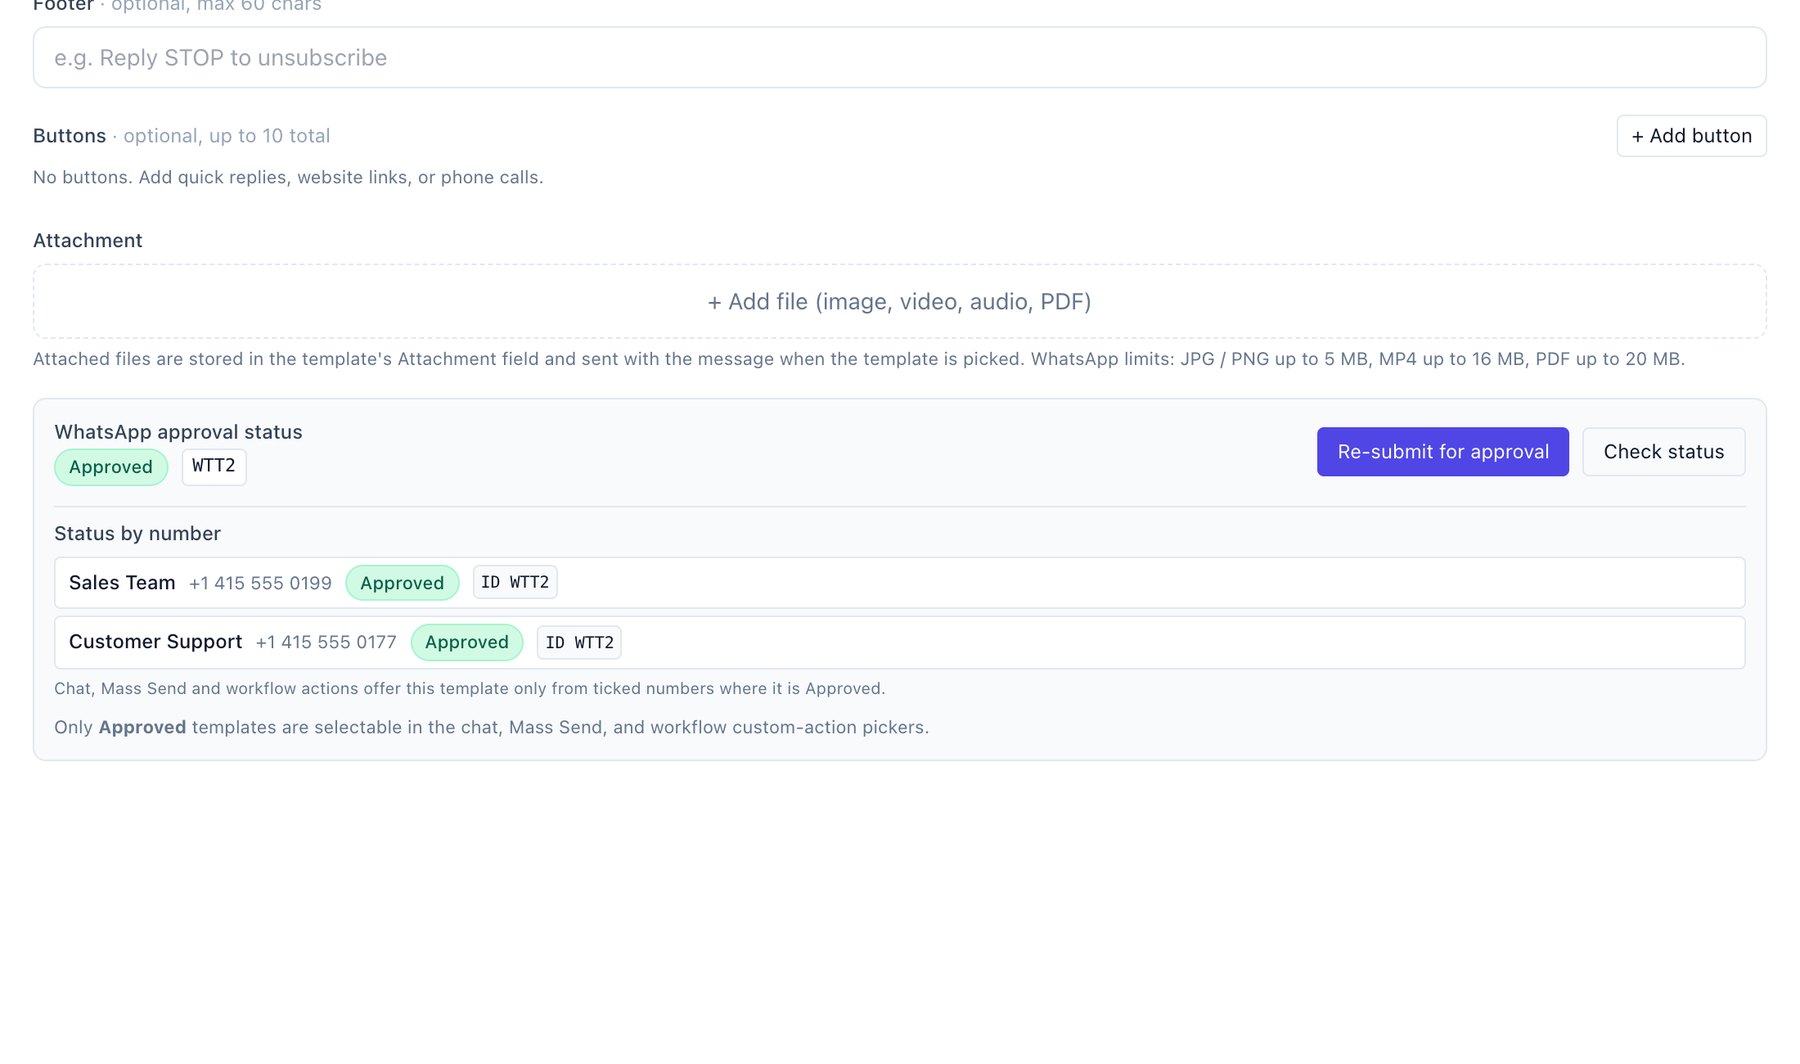
In the Msg Templates module, click + Import template, tick the approved templates from your WhatsApp account, and import them. Templates belong to a WhatsApp Business Account; if you have several accounts, each template is linked to the numbers in its account.
Map variables #
Open an imported template and use Map Variables to link each placeholder ({{1}}, {{2}}…) to a CRM field such as First Name. For media templates, set the header file, or choose a file field on the record so each customer gets their own document.
Create and submit a template #
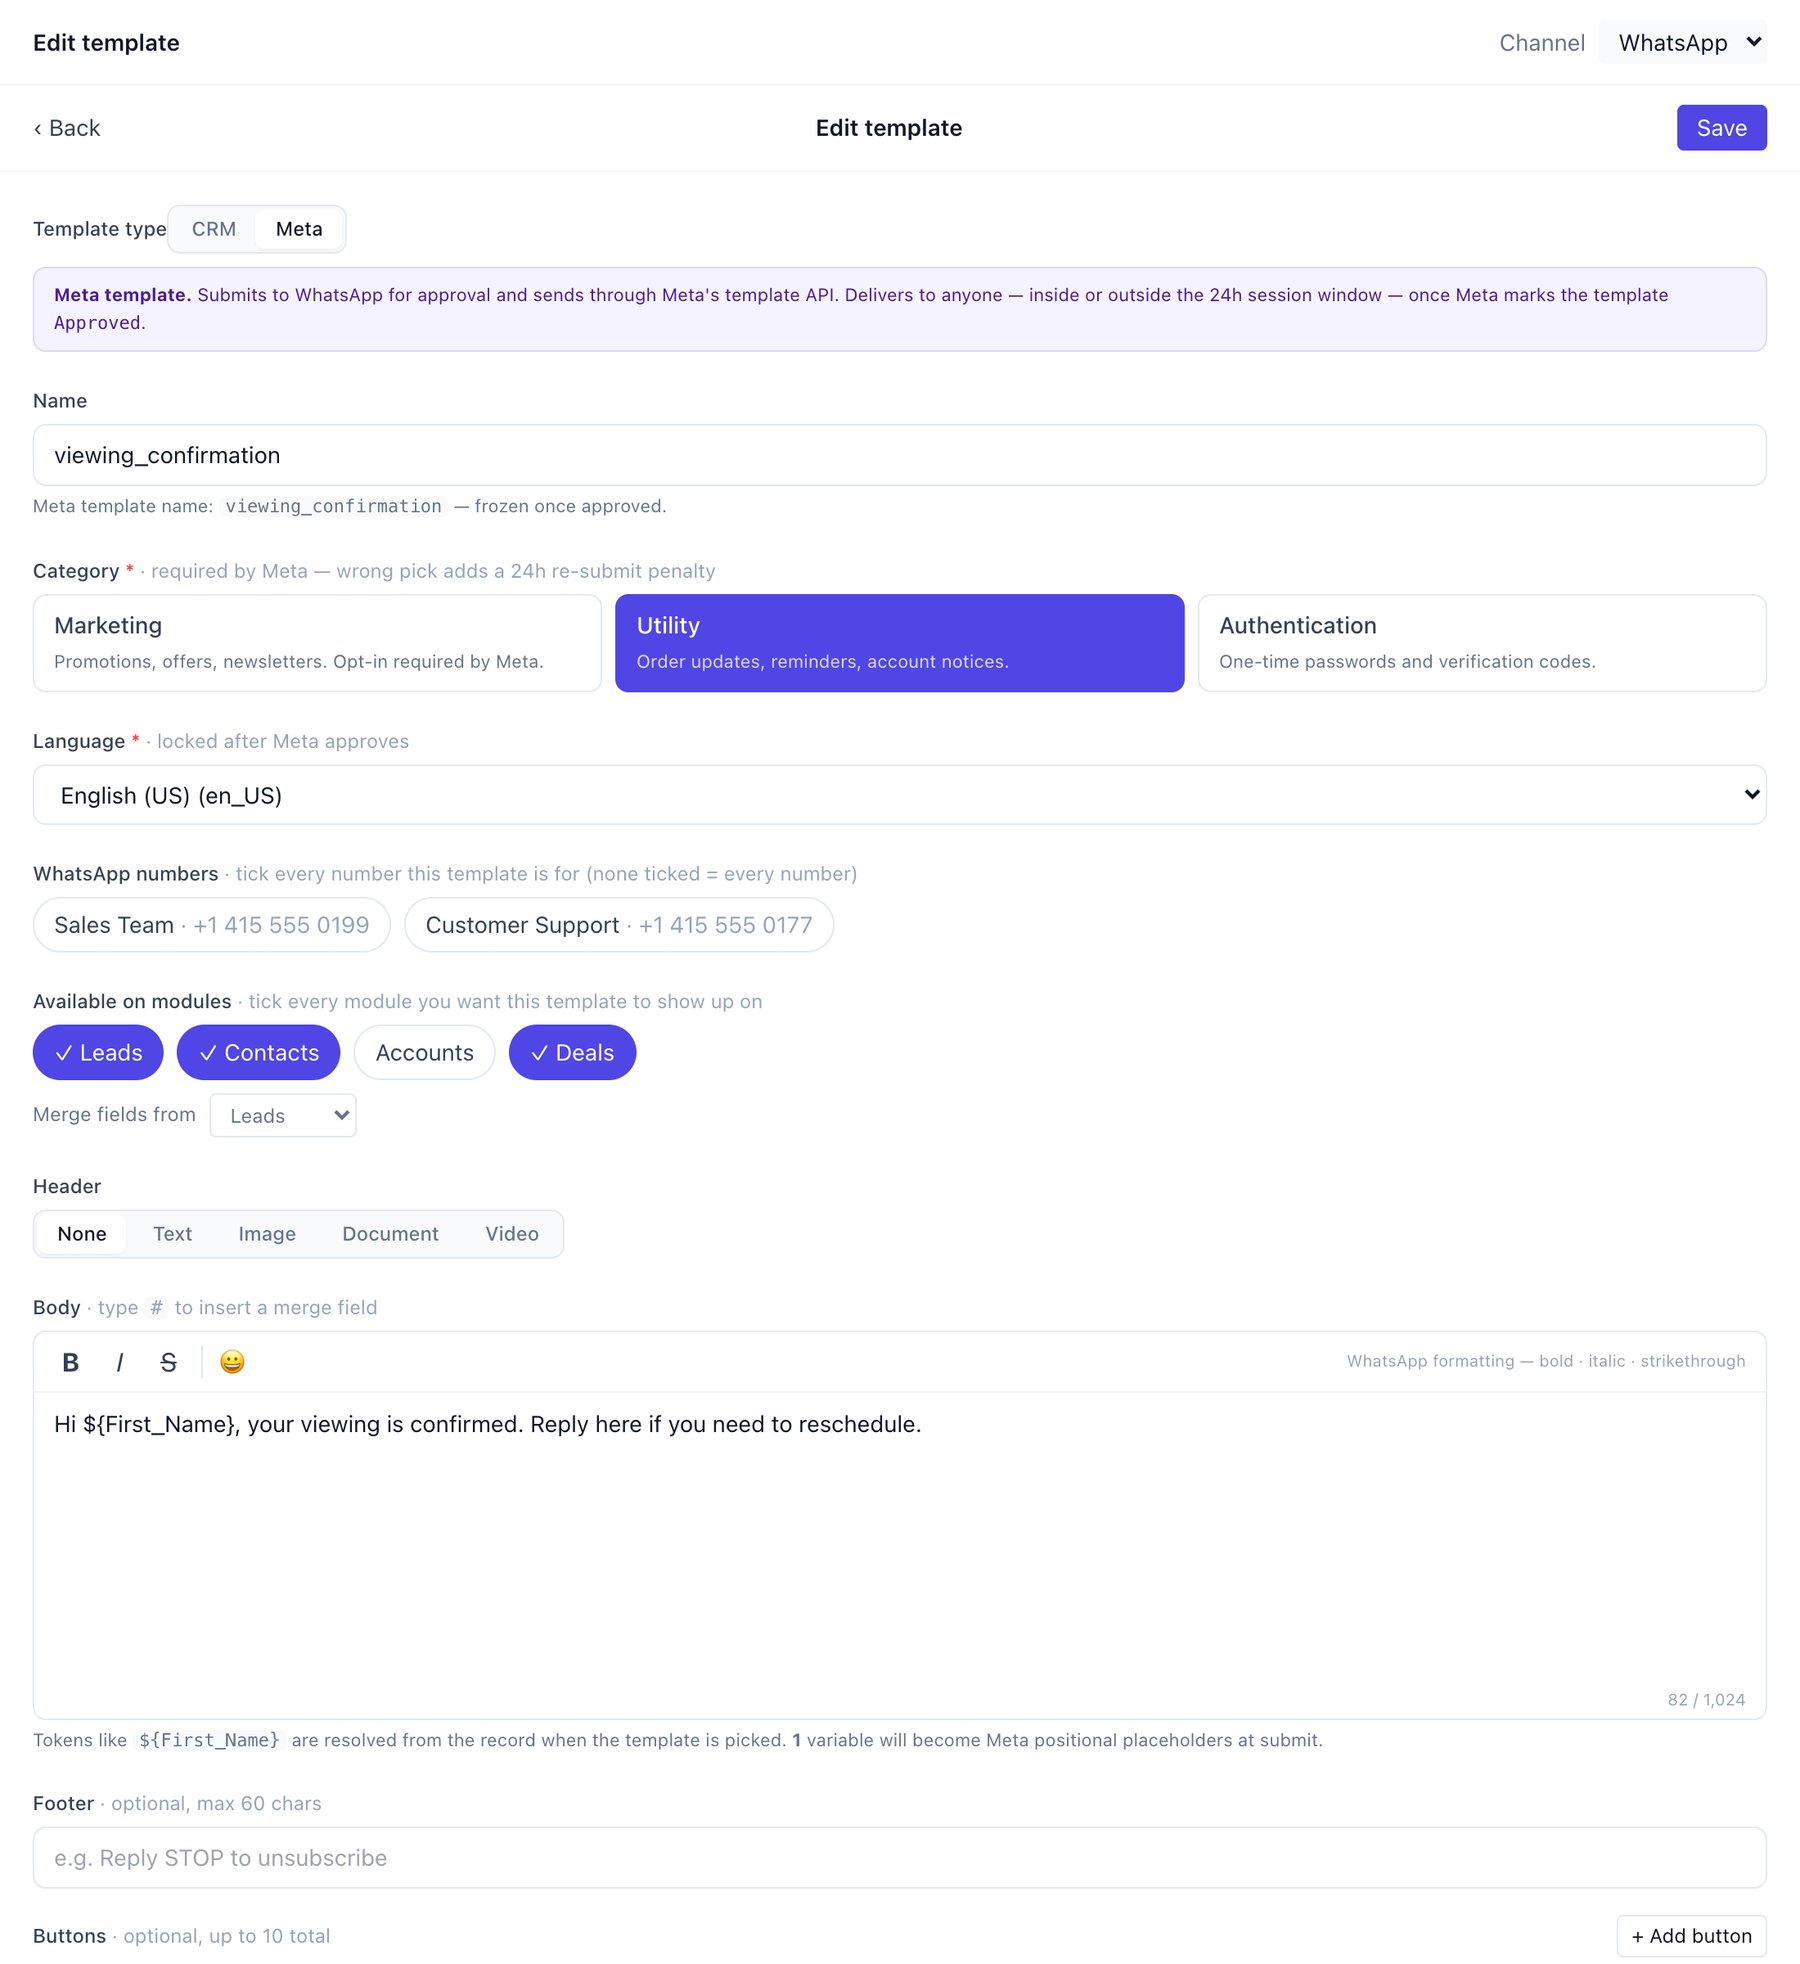
- Click + New (in the chat Templates picker or the Msg Templates module) and set Template type to Meta.
- Name it in lowercase with underscores, and choose a category: Marketing for offers, Utility for updates and reminders, Authentication for one-time codes.
- Choose the language, an optional header (text, image, document or video), the body with
#merge fields, an optional footer and buttons. - Save, then click Send to WhatsApp for approval. The yellow box lists anything Meta is likely to reject before you submit.
- Use Check status later. Approval usually takes minutes. Only Approved templates appear in the chat, Mass Send and workflow pickers.
8. Workflow rules (automation) #
Setup → Automation → Workflow Rules- Create or open a rule on Leads, Contacts, Accounts or Deals.
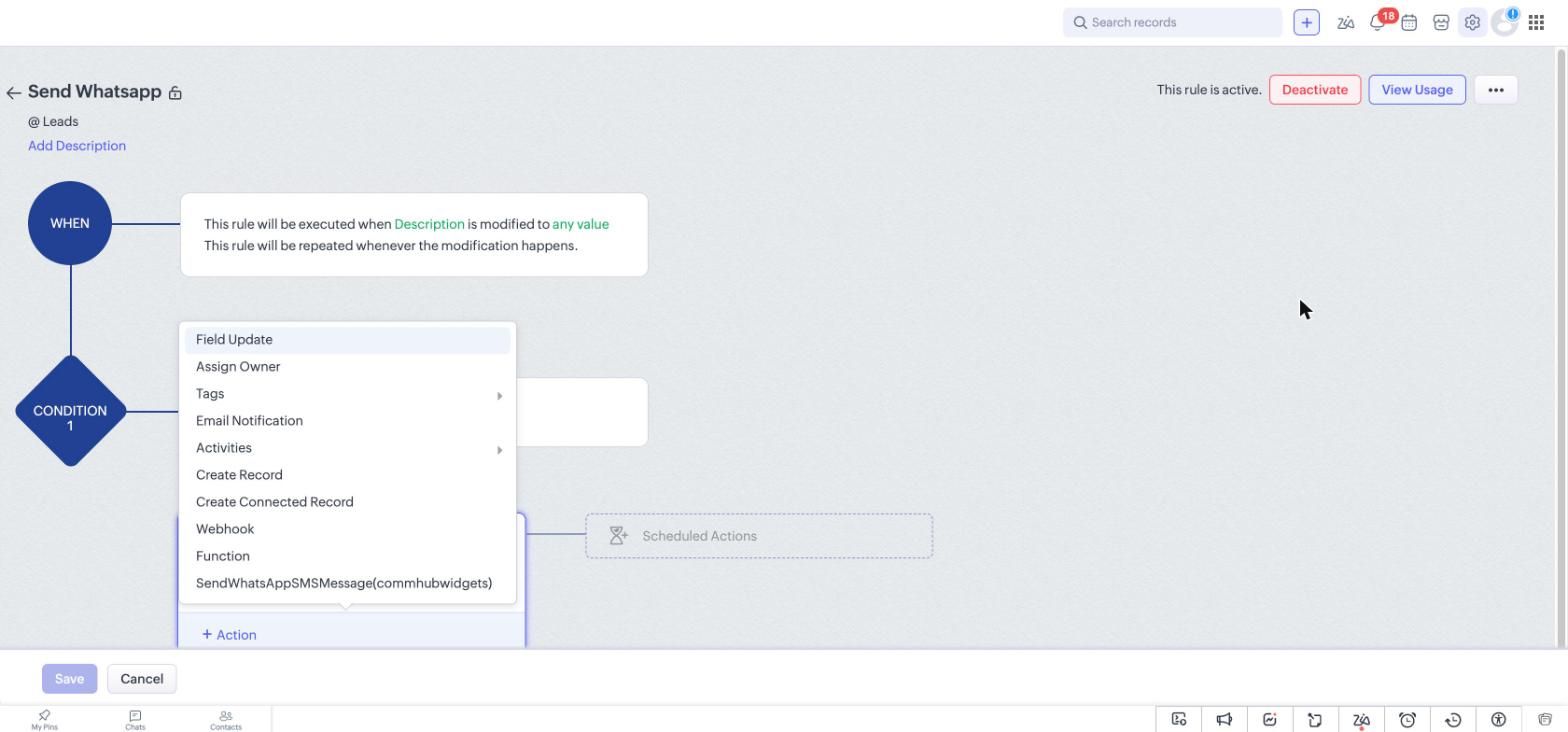
- Under Instant or Scheduled Actions, click + Action and choose SendWhatsAppSMSMessage.
- Choose the module, then Use a template or Free message. Save the action, then save the rule.
- Use scheduled actions for drip sequences, for example day 1, day 3 and day 7.
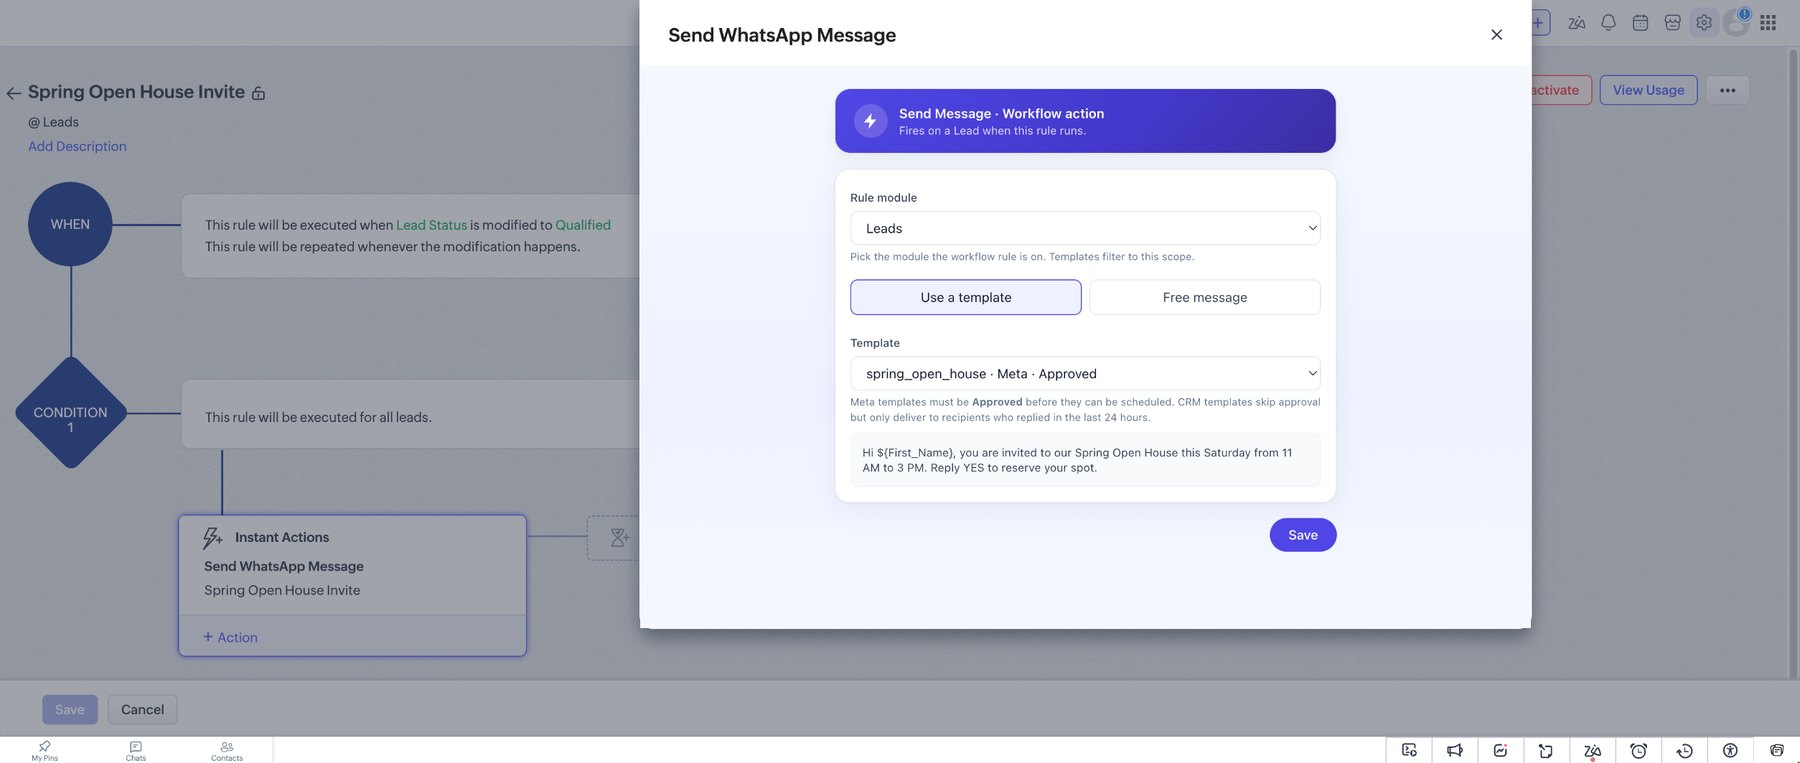
Workflow rules often fire outside the 24-hour window, so use an approved Meta template.
9. Users and access #
- Control who sees the extension through the profiles you chose at install (Setup → Marketplace → Installed → Manage permissions).
- Record-level access follows CRM: a user only sees chats on records they can open.
- Only administrators should edit sender numbers and tokens.
10. Maintenance #
- Quality rating: GREEN is healthy. YELLOW or RED means customers are blocking or reporting you; slow down marketing sends and review content.
- Messaging limits: Meta sets how many new customers each number can message per day. Verify shows the current tier.
- Token rotation: edit the number and paste the new token. Leave the field empty to keep the existing one.
- If replies stop arriving: click Re-subscribe on the number and check the webhook in Meta. See Troubleshooting.
11. Uninstall #
Delete the sender numbers in Settings, remove the system user's access (or delete the token) in Meta, then uninstall from Setup → Marketplace → Installed. See Data Deletion Instructions for what is removed and how to request deletion.
Need help with setup? Email contact@aioautomations.com or book a call.